
Introduction
The big news shows often records their program in a virtual set which means that the studio actually has a green backdrop and the studio interior is added to the scene later on. There are two different types of virtual studios:
– Virtual 3D Studio: The actual camera position and its movement in the studio is used to render a 3D scene in real time from the perspective of the camera and added to the video. This technique requires a sophisticated setup and there for is cost intensive.
– Virtual Set: The camera positions are fixed and won’t change while production. Now you can use static images as backgrounds to create the illusion of a big set on a budget. This technique is described here.
Plan Your Studio
To create a virtual set with mimoLive you need to think about your studio and the placement of you cameras first. Depending on how many cameras you plan to use you need the amount of space and green screen fabric in your studio. Also depending on how far the actors will move in your scene the size of your green screen needs to be adopted, however it may not depend on the size of the resulting video production because you can scale the green screen video to any size to fit into your virtual set image.
Virtual Set With One Camera In mimoLive
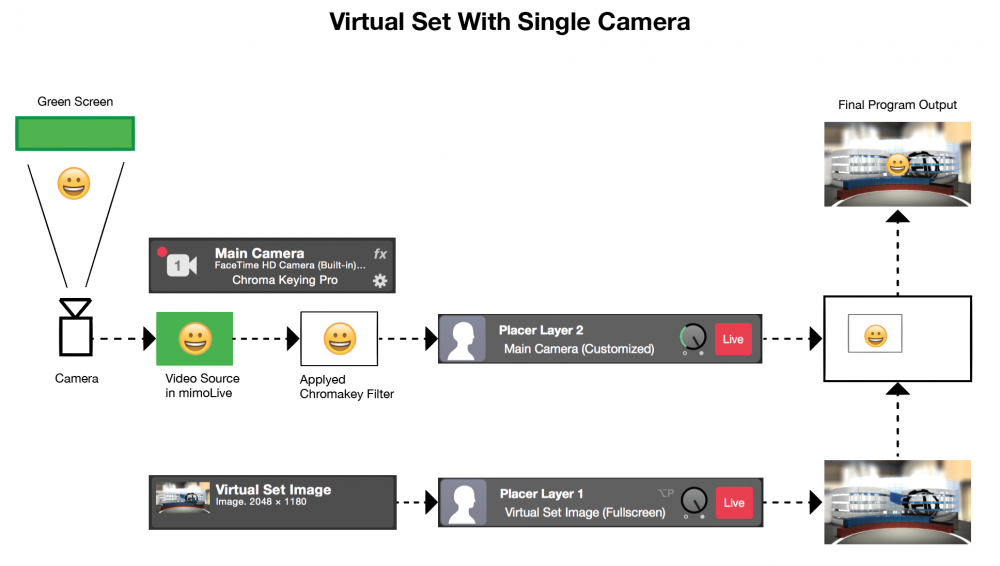
The easiest virtual set you can create is one with a single camera. In mimoLive you will have one Video Source carrying the video signal from your camera. This video source needs to be chroma keyed (please refere to Chroma Keying to learn about this feature).
The chroma keyed vide source is then placed on the canvas with a “Placer Layer”:doc:placer . Below this layer you put another Placer Layer with the image of your virtual set. If it is necessary you can switch the “Show as” option in the Geormetry section from “Fullscreen” to “Custom”. With this you will be able to freely position and zoom the chroma keyed video in your virtual set.
*You may add another Placer Layer at top of your layer stack with an semi transparent image (e.g. containing a desk). This will hide portions of the actors and adds the illusion of depth of field to the production.
Virtual Set With Multiple Cameras In mimoLive
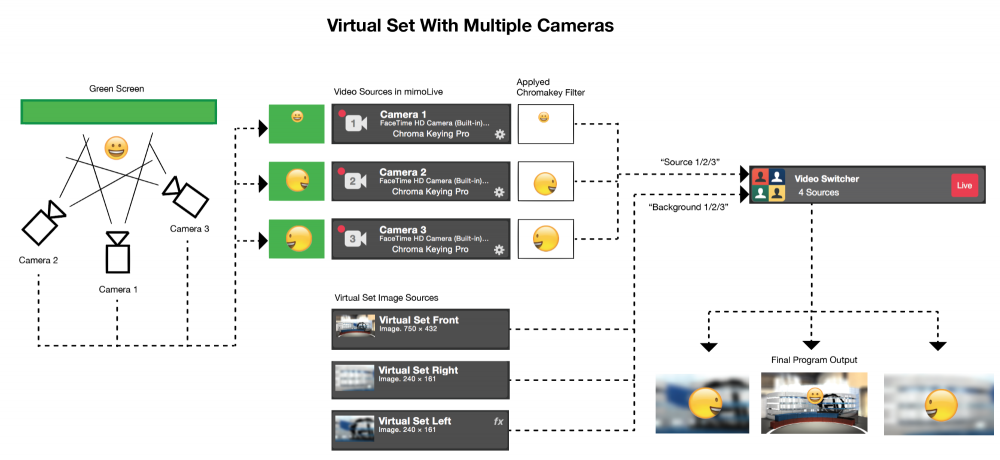
A bit more complex to set up is a virtual set with multiple cameras. You will need to have a separate Video Source for each camera in mimoLive. Those video sources needs to be chroma keyed (please refere to Chroma Keying to learn about this feature).
Because you want to switch between the different camera angles you will use a Video Switcher Layer to bring your chroma keyed video source to the canvas. Once you added the Video Switcher Layer to the layer stack you can assign the chroma keyed video sources to it as “Source 1/2/3” in the Content section of the Video Switcher Layer.
To add the virtual background for each camera angle you need to have images thats shows the certain perspective of each camera. Those images needs to be assigned as “Background 1/2/3” to the Video Switcher Layer in the “Backgrounds Optional” section.
*In order to create the illusion of death of field you should use blurry background images for close ups.
Now that you set up every thing you are ready to use the control buttons in the Video Switcher Layer to switch between your different cameras.
Adding Dynamic Elements to Your Virtual Set
You can use the Placer with Distortion layer to map other video sources or graphics to the virtual walls or a fake TV screen in the background of your virtual set.